Generic HID - DIY USB HID / Joystick / CNC Pendant
Introduction
Generic HID is a tool that allows anyone to create their own USB HID device. HID is an acronym for Human Interface Device. It is a very general specification that specifies how input and output controls should be configured so any computer can read them. A HID device can be a joystick, game pad, keyboard, mouse, CNC pendant, bar code reader, force feedback device; anything that interacts with a user.
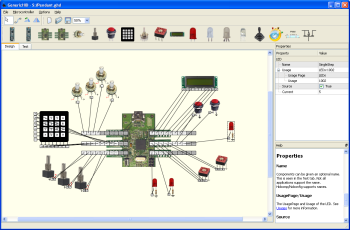
Generic HID comprises two parts: hardware and configuration software. The hardware can be any Atmel at90usb1287 or at90usb1286 based board. The cheapest of these are the teensy++2.0 development board or the at90usbkey demo board which you can get for under $US30. The software is open sourced and can be downloaded below. It runs on both Linux and Windows By dragging and dropping components, then hooking up the pins with virtual wires, the hardware can be programmed with the configuration. Then just physically hook up the components and viola! A USB HID device!
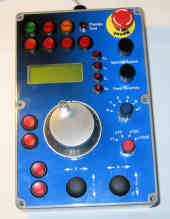
The picture below show my first test CNC pendant and the software configuration used to define it. Click on them for large images.
 |
So what components does Generic HID support?
| Item | Maximum Number |
Description |
| at90usb1287 | 1 | This is the microcontroller that does all the work. It has 48 multi-use I/O pins. Currently this is the only type supported. |
| Potentiometer | 81 | A potentiometer is a variable input component, typically found on a joystick axis, but the term here means any analogue input. |
| Digital Encoder | 81 | An encoder spins like a potentiometer, provides relative movement information, rather than absolute position. Currently only digital type encoders are supported. Mechanical devices that require pull-up resistors and debouncing will not work reliably. |
| Push Button | 481 | Individual push buttons. |
| Key Matrix Buttons | 5761 | More individual keys can be added if they are wired up in a matrix. A matrix with 4 rows and 4 columns, uses 4+4=8 I/O pins and provides 4x4=16 buttons. |
| Rotary Selector Switches | 241 | Rotary selector switches act like a multi state button. Each output state takes up 1 I/O pin. |
| Coded Rotary Switch | 481 | Like the rotary selector switch above, but the output is binary encoded. For example, instead of requiring 4 I/O pins for 4 inputs, the coded switch can encoded the value into 2 binary bits, using up only 2 I/O pins. |
| LCD | 421 | Simple character based LCD display devices. These come in various configurations like 8x1, 16x2, 20x4, 40x2. 40x4 displays are supported as 2 displays. |
| LCD SPI | 11 | A custom graphic LCD display interfaced via the SPI bus is supported. This is a custom display with 320x240 resolution with 16 bit colour. Details are here. |
| LED | 481 | LEDs can be used for status indicators. Each LED takes up 1 I/O pin. Beware of the maximum current draw. |
| Bi-Colour LED | 241 | These are devices with two LEDs installed in opposite directions in the one package. They can display 3 states - off, LED1, LED2. |
| Tri-Colour LED | 241 | These are devices with two independent LEDs installed in one package. They can display 4 states - off, LED1, LED2, LED1+LED2. |
| RGB LED | 161 | These are devices with three independent LEDs installed in one package, a Red, Green and Blue LED. They can display 8 states. |
| Directional Switch | 241 | Also know as hat switches, these are pads, or joysticks, that indicate direction via switches. They can have 2, 4 or 8 buttons. |
| Counter | 11 | One millisecond accurate counter is supported. Examples of its use are to timestamp updates, or act as a watch dog. |
| PWM | 71 | The at90usb1287 microcontroller supports 8 PWM outputs. These can be used to drive LEDs at different intensities, eg RGB LEDs to give true colour, or to modulate a larger loaded, switched by a transistor, eg the LCD backlight. |
1. Maximums are based on the number of free pins available on the microcontroller. Maximums will be lower if other components are also connected. Maxiumums are also reduced based on the electrical load on the microcontroller. Maximums can be restricted by the 4kB memory limit of the configuration data. Maximums can be restricted by the 64 byte data packet size for total inputs and total outputs. Maximums can be restricted by pins that are unable to be freed. Maximums should be reduced by common sense.
Background
To be able to remotely control my CNC Mill, I started playing the simple USB gamepads. Writing my own drivers for Mach3 and EMC allowed me to configure the gamepad to move each axis with the joysticks, and map the buttons to CNC functions. I made the driver support acceleration profiles, which made the joysticks much more useful.
I played a bit with Contour Design's Shuttle Pro, a USB device that has a few buttons, a jog wheel and a dial. I decided this was cool and wanted those features in my pendant too. And LEDs to show status information. And I wanted an LCD for output. And maybe a buzzer. Since there are no pendants out there that can do that (at least any that I can afford), I decided to build my own.
At first I looked at disassembling a joystick and a shuttle, and sticking everything in one box. That wouldn't give me the outputs, and I'd have to run two usb cables (or stick a hub in the pendant) so I decided to build from scratch.
My microcontrollers of choice are the Atmel 8-bit chips. They have a USB capable range, the AT90USBxxx series, available with 8, 16, 64 and 128k flash memories, and versions that supported USB Host or just a device. My original plan was to make my own circuit board, but I wanted this project to be something I could give back to the internet community, so I chose to use the AT90USBKEY as my base.
The AT90USBKEY is a demo board made by Atmel. It is a small board with an 8MHz AT90USB1287, along with some flash memory, a simple switched joystick, some buttons, LEDs, a temperature sensor and voltage regulators. All I/O ports of the microcontroller are accessible via through-holes on the board (although at a crappy 0.1" x 0.05" pitch). The board isn't bad value either at $30.00 (at Digikey last time I looked, or for even cheaper at Mouser, $29.99) compared to $15.05 for just the AT90USB1287 chip.
Recently support was added for the teensy++ 2.0 development board. This is a better option than the USBKey because it is cheaper ($24 at last check) and only has the essential chip and supporting circuitry. Most IO pins are available (46 of them).
The firmware for the board is configured by uploading data to its EEPROM. The configuration data controls some hardware attributes, but mostly it just defines what component is connected to which I/O pin. The configuration data is made using a GUI application, which can then upload changes to the firmware. As long as the boot loader firmware remains intact, no programming hardware is necessary.
Credits
Generic HID is built using many 3rd party libraries and application source code and demos...
| MyUSB / LUFA | The core USB framework is provided by the great work done by Dean Camera and his LUFA libraries. It is listed here as MyUSB because that was its name when I started using it. The Generic HID, as of version 1.2, now uses LUFA. |
| dfu-programmer | The dfu-programmer is an open source DFU programmer. I originally planned to use the Atmel flip application to program the firmware. It worked fine as a library under windows, but was a nightmare to set up and use under Linux. The dfu-programmer source was hacked and corralled into a C++ library for Generic HID to use. |
| libusb v0.1.12 | The low level USB access is done using libusb v0.1.12. Note - this is the older "legacy release". This version is used because it has the same interface as the win32 version. Using libusb means GenericHID can work on Windows, as well as Linux. |
| libusb-1.0 | The new version 1.0 rewrite of libusb0.1. Linux version. |
| libusb-win32 v0.1.12 | This is the Win32 version of the libusb library. |
| Qt | Qt is a cross platform application and UI framework, used to provide the graphics interface. Because I standardised on Qt, I also use the collection classes, threading classes and the XML DOM classes. |
| QtPropertyBrowser | This is an additional Library provided by QtSoftware that implements a property browser class. |
Download and Install
All versions can be downloaded from sourceforge.
Windows
Note that the last released Windows version, 1.2, uses libusb 0.1 which is only documented to work with versions of Windows up to XP. For newer OS versions I recommend you download the free VMWare Player, or equivalent, and install the latest free Ubuntu then follow the linux install instructions below.
Download the latest Win32 binary, generichid_win32_x.x.zip.
- To install the application, create an empty directory and unzip the contents of the file into the new directory.
- Download and install the libusb win32 library, libusb-win32-filter-bin-0.1.12.2.exe
- Download and install the latest version of the Atmel Flip application for windows. This is required to get the drivers for the bootloader mode of the microcontroller.
- If using the AT90USBKey, plug the board in to the USB port, enter bootloader mode (press RST button, press HWB button, release RST button, release HWB button) and install the DFU drivers. These should be in C:\Program Files\Atmel\Flip3\usb\usb_dfu.inf or wherever you installed flip.
- If using a Custom Generic HID board, plug in the board and then install the DFU drivers described in step 3.
- Run the GenericHID.exe application.
Linux
Download the latest Linux Debian package, generichid_x.x_i386.deb.
Install GenericHID with your favourite package manager. Or install it from the command line...
sudo dpkg -i generichid_1.0_i386.deb
GenericHID can be uninstalled using ...
sudo dpkg -r generichid
Type generichid at the command line to run it. Check the section on linux permissions if you see permission or access denied errors in the terminal windows.
Source
The latest version of GenericHID (version 1.3 and later) is available as source code only releases. In a terminal, download the tar file, and extract it...
~> wget <url to tar file>~> tar xf generichid_1.3_src.tgz
Change to the source root directory...
~> cd generichidCheck the build requirements in the BUILD text document.
~/generichid> cat BUILDInstall the build requirements listed in the BUILD document. In version 1.3 they were...
~/generichid> sudo apt-get install build-essential qt4-qmake libqt4-dev libusb-1.0-0-dev gcc-avr binutils-avr gdb-avr avr-libc avrdudeThen run "qmake" to build the makefile, "make" to build the project, then "make install" to install the application...
~/generichid> qmake~/generichid> make
~/generichid> sudo make install
GenericHID can then be run at the commandline...
~/generichid> generichidCheck the section on linux permissions if you see permission or access denied errors in the terminal windows.
Change History
| Version | Date | Description |
|---|---|---|
| 1.5 | 2 Dec 2013 |
|
| 1.4 | 1 Dec 2013 |
|
| 1.3 | 28 Nov 2013 |
|
| 1.2 | 18 Apr 2010 |
|
| 1.1 | 20 Oct 2009 |
|
| 1.0 | 28 Sept 2009 |
|
Known Issues
| The device about to be programmed sometimes doesn't respond to the Start Bootloader button. Pressing it a couple of times sometimes works. Otherwise, use the hardware's method for starting the bootloader. |
